 Save
Save My neighbor knocked on the door one Thursday evening with a jar of homemade pesto she'd made from her garden basil. I had chicken breasts defrosted and half a jar of marinara in the fridge, so I decided to layer everything together instead of choosing between pesto pasta and chicken parm. The smell that filled my kitchen that night—garlic, toasted breadcrumbs, melting cheese—made me forget I'd been improvising. It's been my go-to ever since.
I made this for my brother's birthday dinner last spring, and he asked for the recipe before he even finished his plate. Watching him drag garlic bread through the sauce and pesto that had pooled around the chicken reminded me why I love cooking for people. Food tastes better when someone's genuinely excited about it, and this dish delivers that reaction every single time.
Ingredients
- Boneless, skinless chicken breasts: Pounding them to an even thickness ensures they cook through at the same rate and stay tender, not dry.
- Salt and pepper: Season generously before breading so the flavor goes all the way through the meat, not just on the surface.
- All-purpose flour: This first coating helps the egg stick and creates a base layer that keeps the breading from sliding off in the pan.
- Large eggs: Beat them well so the chicken gets an even, thin coat that crisps up beautifully when it hits the hot oil.
- Italian breadcrumbs: The pre-seasoned kind adds extra flavor, but you can use panko for more crunch or plain crumbs if that's what you have.
- Olive oil: Just enough to get a golden sear on the chicken before it finishes in the oven, keeping things lighter than deep frying.
- Basil pesto: Whether you make it fresh or grab a jar, this is where the herbaceous, garlicky magic happens.
- Marinara sauce: A good quality sauce makes a difference here since it's front and center, so use one you'd actually enjoy eating on pasta.
- Mozzarella cheese, shredded: It melts into gooey, stretchy perfection and creates that classic cheese pull everyone loves.
- Parmesan cheese, grated: Adds a nutty, salty finish and helps the top get beautifully golden in the oven.
- Fresh basil leaves: A handful torn over the top at the end makes it look restaurant-worthy and adds a pop of freshness.
Tired of Takeout? 🥡
Get 10 meals you can make faster than delivery arrives. Seriously.
One email. No spam. Unsubscribe anytime.
Instructions
- Preheat and Prep:
- Set your oven to 375°F and get everything ready before you start breading. It makes the whole process smoother and keeps your hands from getting too messy switching between tasks.
- Pound the Chicken:
- Place each breast between two sheets of plastic wrap or parchment and gently pound with a mallet or rolling pin until they're about half an inch thick all over. This step is the secret to juicy, evenly cooked chicken.
- Season Generously:
- Sprinkle both sides of each breast with salt and pepper, pressing it in lightly with your fingers. Don't be shy here, the seasoning needs to flavor the whole piece of meat.
- Set Up Your Breading Station:
- Line up three shallow dishes with flour in the first, beaten eggs in the second, and breadcrumbs in the third. Keep one hand for dry ingredients and one for wet to avoid clumpy fingers.
- Bread the Chicken:
- Dredge each breast in flour, shake off the excess, dip it in egg, then press it into the breadcrumbs on both sides. Make sure every bit is coated so you get crispy bites in every forkful.
- Sear Until Golden:
- Heat the olive oil in a large skillet over medium-high heat and cook each breast for 3 to 4 minutes per side until the outside is crisp and golden. They won't be fully cooked yet, and that's okay, the oven will finish the job.
- Transfer to Baking Dish:
- Lay the seared chicken breasts in a single layer in your baking dish, leaving a little space between them if you can. This helps the heat circulate and keeps the breading from getting soggy.
- Layer the Pesto and Sauce:
- Spread a generous tablespoon or two of pesto over each piece, then spoon marinara sauce on top. The layers create pockets of flavor that soak into the chicken as it bakes.
- Top with Cheese:
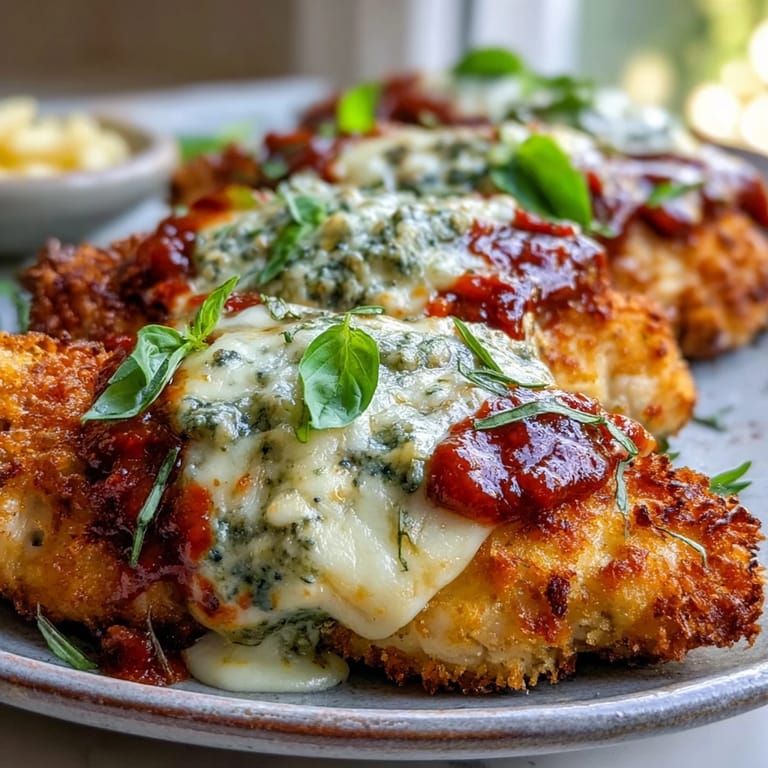
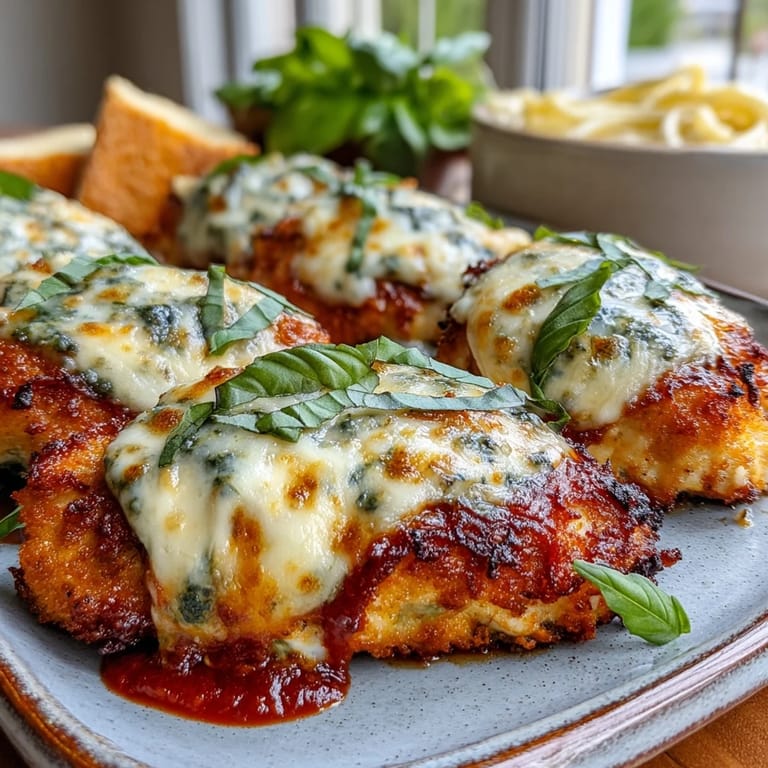
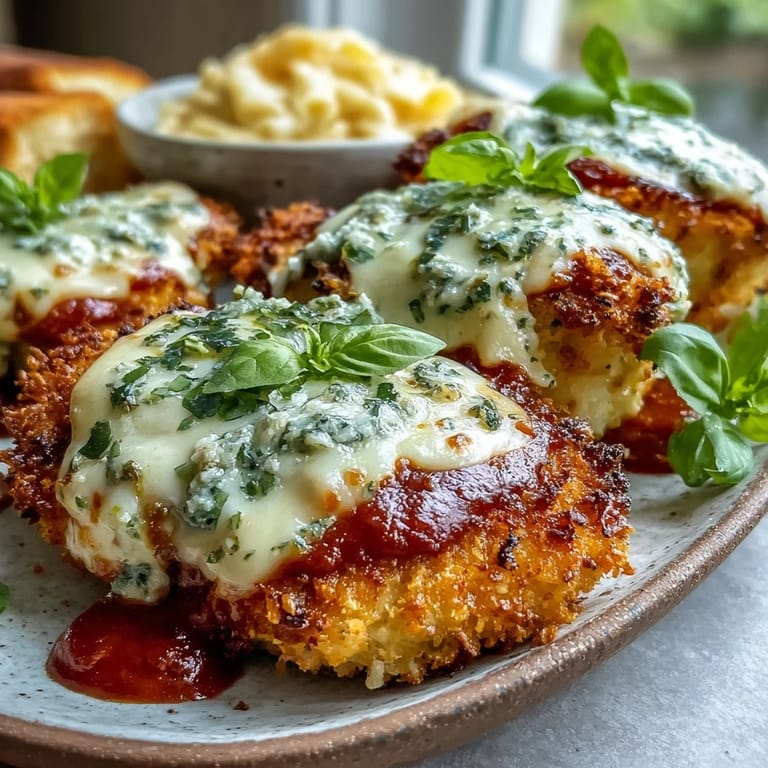
- Sprinkle mozzarella and Parmesan evenly over each breast, covering the sauce completely. The cheese will melt down and get bubbly and golden at the edges.
- Bake Until Bubbly:
- Slide the dish into the oven and bake for 15 to 20 minutes, until the cheese is melted and lightly browned and the chicken reaches 165°F inside. Let it rest for a couple minutes before serving so the juices settle back into the meat.
 Save
Save The first time I served this, my friend who claims she doesn't like chicken parm had three helpings. She said the pesto changed everything, made it feel lighter and more interesting than the heavy, sauce-drowned versions she'd had before. I've made it for her at least five times since, and it always disappears fast.
Serving Suggestions
This pairs beautifully with a simple side of spaghetti tossed in butter and Parmesan, or with garlic bread to soak up all the extra sauce and pesto. I've also served it over a bed of arugula with a squeeze of lemon, which adds a peppery freshness that balances the richness. A crisp green salad with a light vinaigrette on the side rounds out the meal without weighing you down.
Storage and Reheating
Leftovers keep well in an airtight container in the fridge for up to three days. Reheat in a 350°F oven for about 10 minutes to keep the breading crispy, microwaving works in a pinch but the coating will soften. I sometimes slice leftover chicken and tuck it into a sandwich with extra pesto and fresh mozzarella, and it's just as good the next day.
Make It Your Own
If you want extra crunch, swap regular breadcrumbs for panko and press them on firmly before searing. You can also make this gluten-free by using gluten-free flour and breadcrumbs, the texture comes out nearly identical. For a spicier kick, stir a pinch of red pepper flakes into the marinara or use a spicy arrabbiata sauce instead.
- Try sun-dried tomato pesto instead of basil for a richer, tangier flavor.
- Add a handful of baby spinach under the cheese for extra color and nutrition.
- Use a mix of mozzarella and provolone for a deeper, smokier cheese flavor.
 Save
Save This dish has become one of those recipes I turn to when I want something comforting but not boring, familiar but with a little twist that makes it feel special. I hope it lands on your table as often as it does on mine.
Recipe FAQs
- → Can I make this ahead of time?
Absolutely. You can bread the chicken up to 24 hours in advance and store it refrigerated. You can also assemble the entire dish and refrigerate unbaked for up to 8 hours before baking, though you may need to add a few extra minutes to the cooking time if starting from cold.
- → What goes well with pesto chicken parmesan?
This pairs beautifully with spaghetti, angel hair, or penne tossed in olive oil and garlic. Crusty garlic bread, roasted vegetables like zucchini or broccoli, and a simple green salad with balsamic vinaigrette are all excellent sides that complement the rich, cheesy flavors.
- → Can I use store-bought pesto?
Yes, store-bought pesto works perfectly fine. Look for a refrigerated brand with fresh ingredients for the best flavor. If you prefer homemade, you can whip up a simple basil pesto with fresh basil, pine nuts, garlic, Parmesan, and olive oil in about 10 minutes.
- → How do I know when the chicken is fully cooked?
The safest way is to use a meat thermometer inserted into the thickest part of the chicken breast. It should read 165°F (74°C). Visual cues include clear juices running from the thickest part when pierced and the meat feeling firm to the touch rather than squishy.
- → Can I freeze this dish?
You can freeze unbaked breaded chicken pieces for up to 3 months. Place them on a baking sheet to freeze individually first, then transfer to a freezer bag. When ready to cook, bake from frozen, adding about 10-15 minutes to the baking time. Already-baked portions can be frozen for up to 2 months and reheated in the oven.
- → What's the best way to pound chicken breasts evenly?
Place the chicken between two sheets of plastic wrap or in a zip-top bag. Using the flat side of a meat mallet or a rolling pin, start from the center and work outward, pounding gently and evenly until the breast reaches about ½-inch thickness throughout. This ensures even cooking and tender results.