 Save
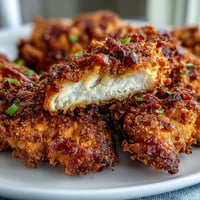
Save My neighbor handed me a bowl of these at a Super Bowl party and I barely made it through the second quarter before going back for more. The heat from the buffalo sauce hit first, then the bacon crunch, and finally that molten mozzarella center that stuck to my fingers. I asked for the recipe on the spot, scribbled it on a napkin, and made them the following weekend. They disappeared faster than I could fry them.
I made a double batch for my sons birthday and watched a group of teenagers devour them in minutes, barely pausing to breathe. One kid asked if I sold them, which might be the highest compliment a home cook can get. The kitchen smelled like a sports bar for hours afterward, all smoky bacon and tangy heat. I ended up freezing half the second batch because I knew I would eat them all if I didnt.
Ingredients
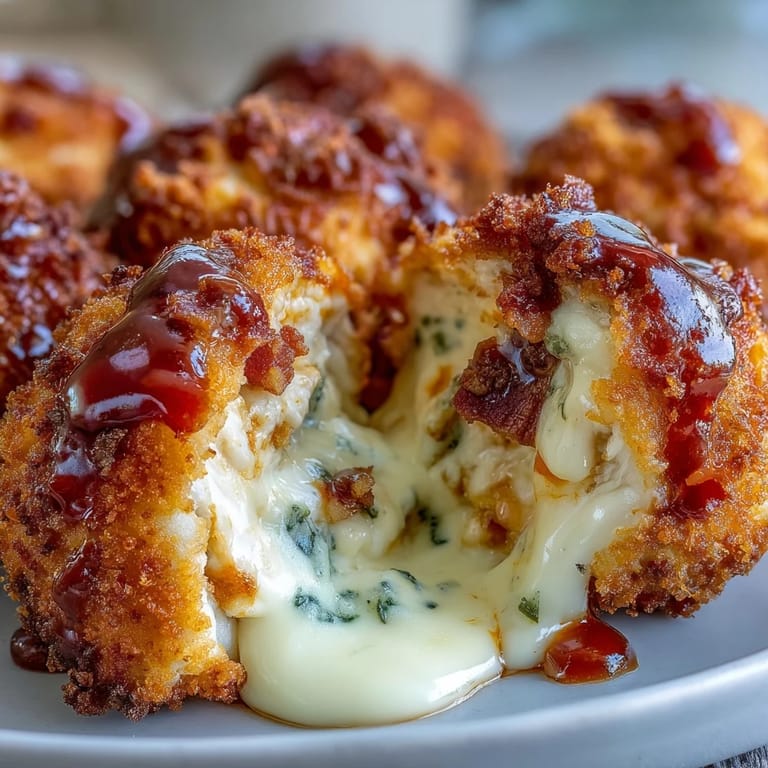
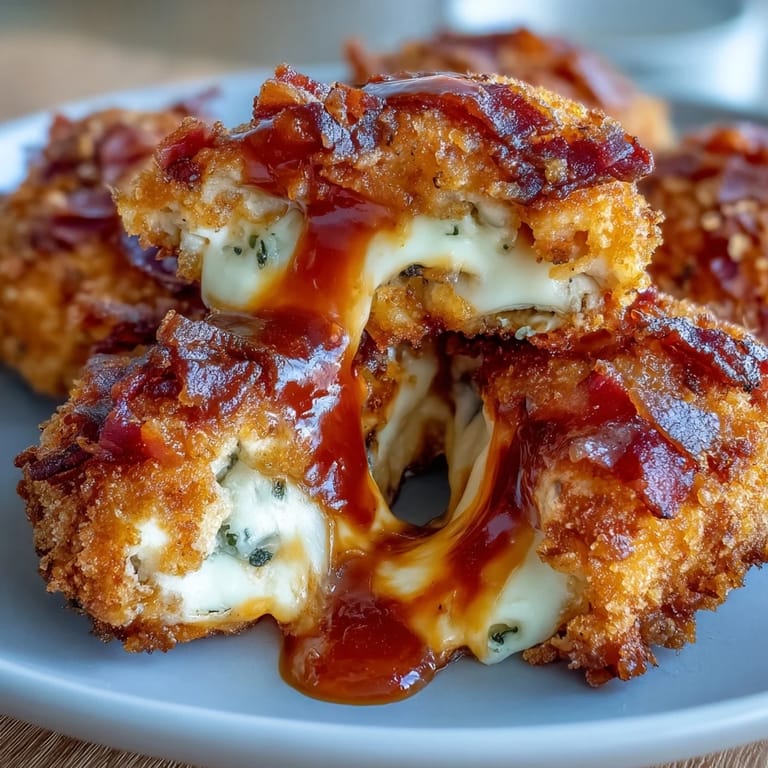
- Mozzarella cheese: Use block mozzarella and cut it yourself, pre-shredded never melts the same and you want that dramatic cheese pull.
- Cooked bacon: Crumble it while its still warm so it stays in chunks, cold bacon shatters into dust and loses its presence.
- Ground chicken: Leaner than beef but still moist enough to hold the filling, plus it takes on the buffalo flavor without fighting it.
- Buffalo sauce: The soul of the dish, divided so you season the meat and finish with a glossy coating that clings to every ridge.
- Garlic powder, onion powder, paprika: These create a base layer of flavor so the chicken doesnt taste flat even before the sauce hits.
- Plain flour: The first step in breading, it dries the surface so the egg has something to grip.
- Eggs: Beaten until smooth, they act like glue between the flour and breadcrumbs.
- Breadcrumbs, preferably panko: Panko gives you that shatteringly crisp shell, regular breadcrumbs work but they go soft faster.
- Vegetable oil or canola oil: High smoke point and neutral flavor, let it get properly hot or the coating will soak up grease instead of crisping.
Tired of Takeout? 🥡
Get 10 meals you can make faster than delivery arrives. Seriously.
One email. No spam. Unsubscribe anytime.
Instructions
- Prep the filling:
- Slice mozzarella into cubes about the size of a marble, then wrap each one with a pinch of crumbled bacon. The bacon acts like a barrier so the cheese doesnt leak out too fast during cooking.
- Season the chicken:
- In a mixing bowl, combine ground chicken with half the buffalo sauce, garlic powder, onion powder, paprika, salt, and pepper, mixing until everything is evenly distributed. Dont overmix or the meat gets tough.
- Form the bombs:
- Take a heaping tablespoon of chicken mixture, flatten it in your palm, place a bacon-wrapped mozzarella cube in the center, then fold the edges up and around, sealing it completely. Roll it smooth between your palms so there are no cracks.
- Bread them:
- Dredge each ball in flour, shake off the excess, dip into beaten egg, then roll in breadcrumbs, pressing gently so they stick. Set them on a plate as you go.
- Fry or bake:
- For frying, heat oil to 175 degrees Celsius and fry in batches for 5 to 6 minutes, turning occasionally, until golden and cooked through. For baking, arrange on a greased tray and bake at 200 degrees Celsius for 18 to 20 minutes until crisp and the internal temp hits safe levels.
- Finish and serve:
- While theyre still hot, drizzle or toss with the remaining buffalo sauce so it soaks into the crevices. Serve immediately while the cheese is molten.
 Save
Save I brought these to a potluck and someone asked if they were from a restaurant. That moment when you realize your home cooking can hold its own against the professionals is a quiet thrill. I went home with an empty tray and three requests for the recipe.
Choosing Your Cooking Method
Frying gives you the crispiest shell and the fastest cook time, but baking is lighter and lets you do a whole batch at once without babysitting the stove. I fry when I want maximum crunch and bake when Im feeding a crowd or trying to keep things a little less indulgent. Both methods work beautifully as long as you dont undercook the chicken.
Serving Suggestions
Ranch dressing is the classic pairing, cool and creamy against all that heat, but blue cheese dip brings a funky sharpness that some people swear by. I put out both and let people choose their side. A platter of celery sticks and carrot rounds helps cut the richness, plus it makes the whole spread look like it came from a pub.
Make Ahead and Storage Tips
You can bread these up to a day ahead and keep them in the fridge on a parchment-lined tray, just cover them loosely so the coating doesnt get soggy. Freezing works too, lay them flat on a tray until solid, then transfer to a bag. Fry or bake from frozen, adding a few extra minutes to the cook time.
- Always bring them to room temperature for 10 minutes before cooking if refrigerated, it helps them cook evenly.
- Reheat leftovers in the oven at 180 degrees Celsius for 8 minutes, microwaving turns the coating to mush.
- If making a big batch, keep finished bombs warm in a low oven while you finish frying the rest.
 Save
Save These bombs have become my go-to whenever I need to impress without spending all day in the kitchen. Theyre messy, theyre bold, and theyre gone before you know it.
Recipe FAQs
- → Can I bake these instead of frying?
Yes, baking works well. Place on a greased tray at 200°C (400°F) for 18–20 minutes until crisp and cooked through. Use panko for best results.
- → What dipping sauce pairs best?
Cool ranch or blue cheese dip balances the spicy buffalo heat perfectly. The creamy dressing cuts through the richness while complementing the bold flavors.
- → Can I make these ahead of time?
Assemble the bombs and refrigerate up to 4 hours before cooking. For best results, fry or bake just before serving to maintain the crispy coating.
- → How do I prevent cheese from leaking during cooking?
Ensure the chicken completely seals around the cheese cube, with no gaps. Pinch edges firmly and roll between palms to create a smooth, even surface.
- → Can I use cooked chicken instead of ground?
Ground chicken works best as it binds together, sealing the cheese inside. Shredded cooked chicken won't hold its shape around the filling.
- → What oil temperature is ideal for frying?
Heat oil to 175°C (350°F). Use a kitchen thermometer to maintain consistent temperature, ensuring even cooking without burning the coating.